Archive
Steps to Install VNC Server on Ubuntu
Steps to Install VNCServer on any VM
==========================================
ubuntu@karun-sec-4:~$ sudo http_proxy=$http_proxy apt-get update
ubuntu@karun-sec-4:~$ sudo http_proxy=$http_proxy apt-get install gnome-core
ubuntu@karun-sec-4:~$ sudo http_proxy=$http_proxy apt-get install xfce4 xfce4-goodies vnc4server tightvncserver
ubuntu@karun-sec-4:~$ vi ~/.vnc/xstartup
#!/bin/sh
def
export XKL_XMODMAP_DISABLE=1
unset SESSION_MANAGER
unset DBUS_SESSION_BUS_ADDRESS
gnome-panel &
gnome-settings-daemon &
metacity &
nautilus &
gnome-terminal &
startxfce4 &
ubuntu@karun-sec-4:~$ sudo chown -R ubuntu:ubuntu /home/ubuntu/.config
# To start VNC Server
ubuntu@karun-sec-4:~$ vncserver -geometry 1920×1080 -depth 24 :1
# open in windows machine TightVNC client and
<vnc server ip>::5901
password: password
Now click on connect button
#Note: to kill VNCserver
ubuntu@karun-sec-4:~$ vncserver -kill :1
Python code debug using rpdb (Keystone source code debugging)
Install rpdb first for debugging keystone python application
$sudo pip install –proxy=$http_proxy rpdb
Go to keystone source repository
# Go into python file where you want to place the rpdb debugging
 ~/keystone/keystone/policy-endpoint/controllers.py
 @controller.protected()
 def check_policy_association_for_endpoint(self, context, policy_id, endpoint_id):
 import rpdb; rpdb.set_trace()
After adding rpdb in the source code now just build and install the code

 ~\keystone$ python setup.py build -v
 ~\keystone$ python setup.py install -v
Restart apache tomcat server
$ sudo service apache2 restart
Issue openstack cli or curl command (above debug starts for below curl operation)
 $ curl -s -H "Content-Type: application/json" -H "X-Auth-Token: 43c976f2941f4ca8a41444707ae6596c" http://localhost:35357/v3/policies/66cdadcc1cda4b768668b1013227e8a3/OS-ENDPOINT-POLICY/endpoints/2fbb8d23ccf74a1e86e491fd6151bcc5
Check the keystone log file you should see that pdb is initiated:
$ sudo tail -f /var/log/apache2/keystone.log
If pdb gets initiated then make sure to telnet on the debugger
$ telnet 127.0.0.1 4444
prompt shows up with python file name
(Pdb) Press enter or to exit ctrl+]
<telnet> quit
n, s and more options available
TLS Protocol & SSL Protocol
SSL (Secure Socket Layer) provides security assurance for any protocol at the application layer that’s based on reliable connections, such as TCP. SSL provides CAI (Confidentiality, Authentication and Integrity) by following way:
1. Confidentiality: Data in transit is encrypted using a symmetric key algorithm thus providing data transmission confidentiality
2. Authentication: It is achieved through 2 way SSL and 1 way SSL configuration. In 2 way SSL digital signature method to authenticate the identity of servers and clients based on certificates is followed. In case of 1 way SSL only server takes part in authentication process.
3. Integrity: Message authentication code (MAC) based on MD5 or SHA to verify the integrity of messages in transit is ensured.
TLS (Transport Layer Security) on other hand is to unify SSL standards on the internet. It is almost same as SSL in componsition, consisting of TLS record protocol and TLS handshake protocol. TLS record protocol is classified into the handshake protocol, alert protocol, ChangeCipherSpec protocol and application protocol.
Oracle Spatial Database Installation11g R2 quick step-by-step
This post lists down the steps to Configure Oracle spatial Database 11gR2 on your machine. This post is definitely not intended for Advanced installation and configuration, it’s just for those users who are looking at an easy approach to installing & configuring Oracle database on their machine.
Pre-installation Requirements:
- You should have at least 1 GB RAM (In current world this isn’t ideal as the Windows OS itself required about 512 MB RAM, I would suggest have a minimum of 2 GB RAM)
- If your machine is on DHCP then you need to have Loop back adapter installed.
- Loop back adapter is required even in case you are currently working in non-network mode but later plan to connect to your network after Oracle installation.
- Steps to install loop back adapter http://docs.oracle.com/cd/B19306_01/install.102/b14316/reqs.htm#BABGCEAI
- Please check the compatibility metrics it’s an excel sheet you can find in the Oracle database download site, just to ensure software you are downloading is compatible to your system configuration
Installation:
- Download Oracle software appropriate version
- Run the installer
- Click Next

- Select Install only option

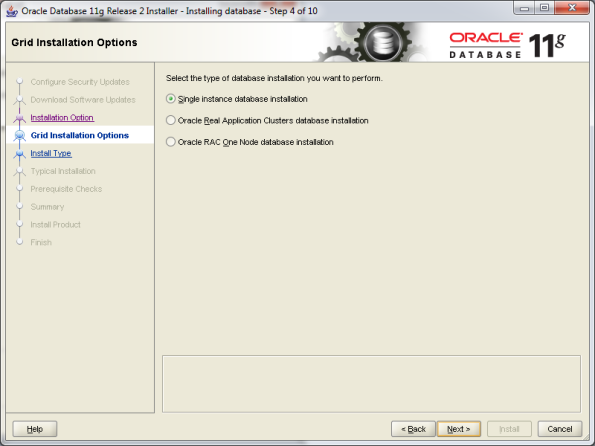
- Click Next, Next, Next, Next till you finish installation successfully
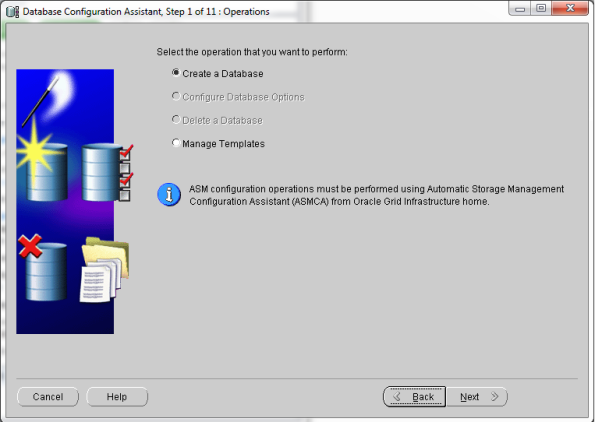
- Now go to start –> Oracle Db Home –> Configuration & Migration tools –> Database Configuration Assistant (DBCA)
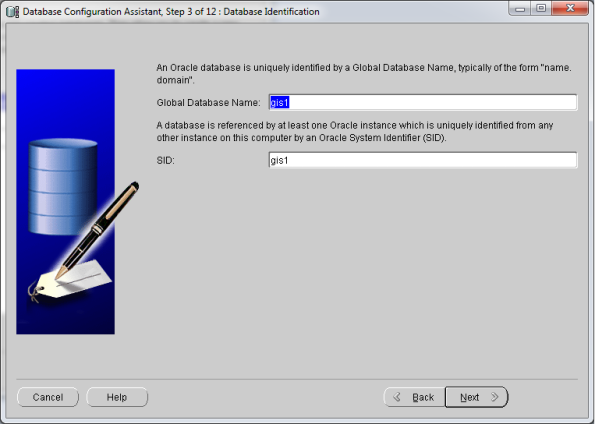
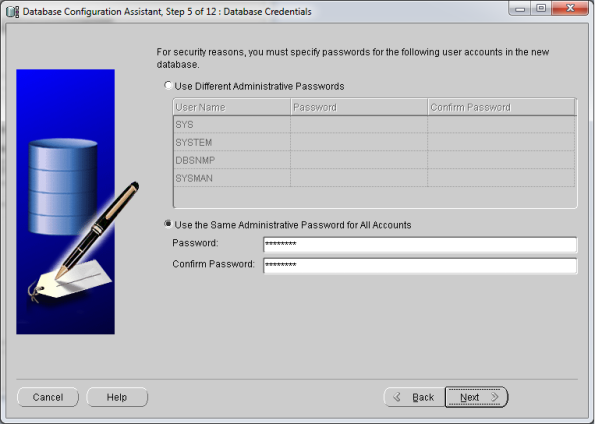
- This should open your DBCA wizard. Now just follow the screens below…


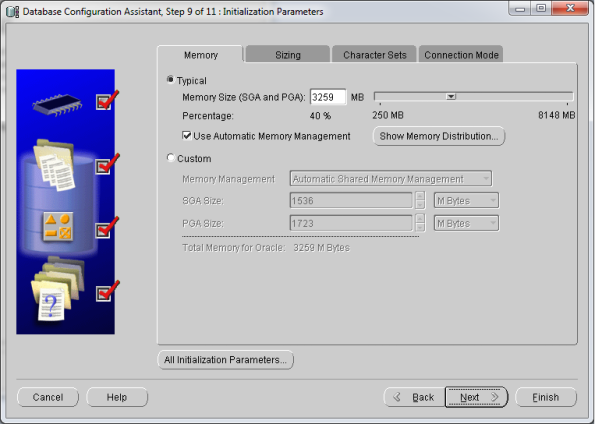
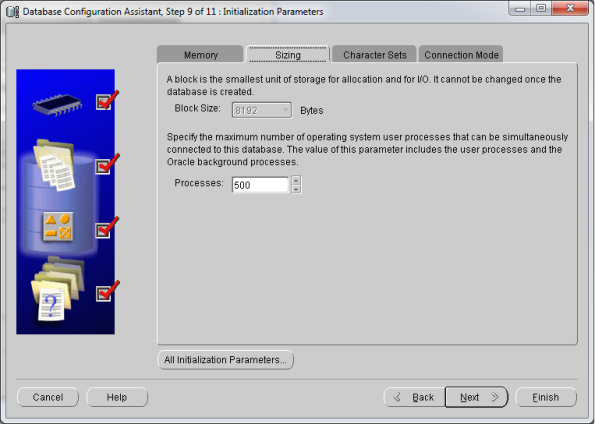


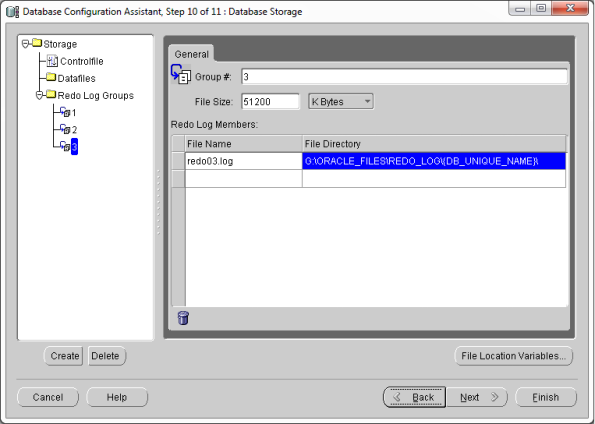

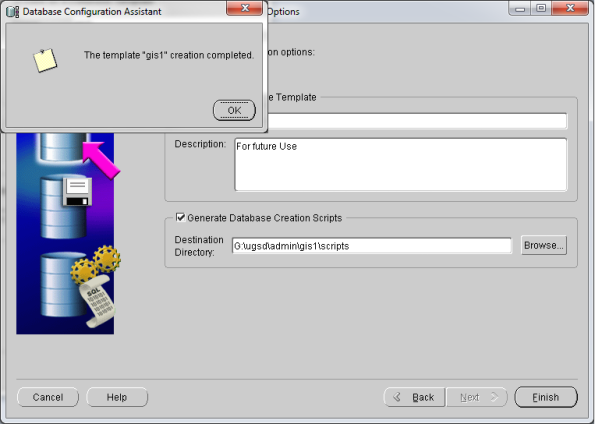

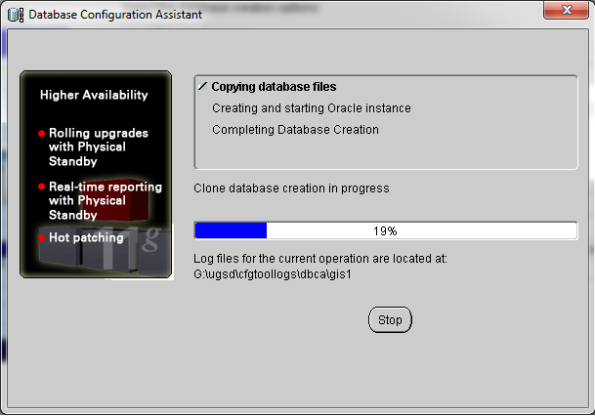

- That’s it! You’ve Oracle Database 11gR2 installed now
- Open command prompt and just type in sqlplus. If you can see the below screen then you now have Oracle db installed & configured on your machine.

- Happy learning…
Series on weblogic
Of late I ‘ve been seeing lot of hits for my posts on Weblogic and Apache Ant. Hence decided to keep the momentum I’ve decided to start a series on weblogic server, web services deployment, security configuration etc stuff I know and have worked on. Hope you like them…
JAR Scan Tool to scan for jar file for given class name
This is a useful tool http://www.inetfeedback.com/jarscan/:
This tool helps you in scanning through your directory structure parses through every jar file for the given class name and comes up with a final report on list of jar files that has this class name defined.
- The tool is written in Java and will run on any system that has Java 1.4 or higher installed. It is available as a standalone, high performance Java application or as a online web application
- You just need to follow 2 simple steps to get it running
- Download the jar file, copy it in your file system
- From command prompt, issue the command
E:\> java -jar jarscan.jar -dir “E:\weblogic” -class SipServerBean
That’s it! here is the output

Java Decompiler
Jdec – Java Decompiler an opensource software. Loved using it!
Download on to the drive say D:\
double click on Jdec-UI.bat

Before starting, you need to configure the properties appropriately as shown in below screen shot.

Configuration–>Jdec(Decompiler) configuration
 Make changes to the configuration

Click Update Changes button.
In the file folder list –> select appropriate class file and double click the same to see the decompiled java class file. That’s it!
TCP/IP Monitoring for viewing SOAP Envelope
One needs a TCP/IP Monitoring tool to monitor the traffic between client and server.
Requirement
I’ve web services deployed on weblogic server. I wrote a Java client to access one of the services works fine. My requirement is to view the SOAPEnvelope request and response.
Here are the simple steps from dailyraaga to help you configure TCP/IP traffic.
STEP 1: Download axis.jar
Download axis.jar.zip file from http://www.java2s.com/Code/Jar/ABC/Downloadaxisjar.htm
Unzip the file to place it in d:\ (you may place it any where, for this post i just dropped the jar file in d drive)
STEP 2:
Run the java command: D:\>java -cp axis.jar org.apache.axis.utils.tcpmon
This should open TCPMonitor
 Since my weblogic is running on localhost on port 7001
Target Hostname: localhost
Target Port: 7001
Give a random Listen Port
Listen Port: 1234
Click on ‘Add’ now
You should see a new tab Port 1234

STEP 3:
In your Java web service client code, add following statements.
System.setProperty("http.proxyHost", "localhost");
 System.setProperty("http.proxyPort", "1234");
 System.setProperty("weblogic.webservice.transport.http.proxy.host", "localhost");
 System.setProperty("weblogic.webservice.transport.http.proxy.port", "7001");
STEP 4:
Now run the java client to see the soap request/response

That’s it!
Security System Administrator vs Network Administrator
I see lot of people interchangeably using these roles in various contexts while talking or in writing. Here in this post I would like to clear out the concept and list down the responsibilities of both the roles.
SYSTEM ADMINISTRATOR
The role of System administrator varies widely from one organization to another. System administrators are usually charged with installing, supporting, and maintaining servers or other computer systems, and planning for and responding to service outages and other problems. Other duties may include scripting or light programming, project management for systems-related projects,
The system administrator is responsible for following things:
- User administration (setup and maintaining account)
- Maintaining system
- Verify that peripherals are working properly
- Quickly arrange repair for hardware in occasion of hardware failure
- Monitor system performance
- Create file systems
- Install software
- Create a backup and recovery policy
- Monitor network communication
- Update system as soon as new version of OS and application software comes out
- Implement the policies for the use of the computer system and network
- System inventory management.
- Preparation of documents for internal and external system audit.
- Setup security policies for users. A system Administrator must have a strong grasp of computer security (firewalls and intrusion detection systems)
NETWORK ADMINISTRATOR
- Manages the data communication needs of the company
- Manages the physical network infrastructure, including wired and wireless local area network (LAN)
- Manages infrastructure servers: Active Directory, WINS, DNS, DHCP, Proxy, RAS, and Internet Security and Acceleration (ISA) Server
- Manages the acquisition of new network hardware as required
- Participates in network planning, design, development, deployment, and modification
- Monitors and controls service levels of network suppliers
- Liaises with the Service Monitoring and Control SMF to establish a list of monitored network activities
- Ensures that data communication within the company is reliable and of sufficient capacity to meet business needs
- Provides physical connections to the corporate LAN as required
- Ensures that data communications packets are routed efficiently
- Provides regular feedback on network performance, both in general and against specific service levels
- Provides access to the corporate network via dial-up or virtual private network (VPN) as required
- Monitors bandwidth use, analyzes traffic patterns and volumes, and determines impact/implications of issues
- Monitors and controls service levels of network suppliers
- Ensures detection of alerts from the network infrastructure
- Provides physical connections to the corporate LAN as required
- Ensures that data communications packets are routed efficiently
- Provides regular feedback on network performance, both in general and against specific service levels
- Monitors bandwidth use, analyzes traffic patterns and volumes, and determines impact/implications of issues
- Monitors incident details, including the configuration items affected
- Investigates and diagnoses incidents and problems (including resolution where possible)
- Detects possible problems and notifies problem management
- Documents the resolution and recovery of assigned incidents
- Acts as a restoration team member, if required, during major incidents
- Carries out actions in order to correct known errors
- Performs monitoring and analysis of intrusion detection and other security breaches
- Maintains access list
- Performs firewall maintenance
- Ensures security standards are upheld.
Product Penetration Testing – A Generic Framework
This post highlights on the steps for Product Penetration Testing – A Generic Framework.
Unlike my previous post, which is more close to Network Penetration Testing this post is more about Products and their security. Usually QA who tests the products may not have the right expertise in Security Testing of the Products. It should be understood that companies should rightly invest in such teams, so that any security holes would popup at the initial stage instead of waiting till go to market and thus facing last minute hiccups!
Now let’s get into actual stuff. Let’s start with Black box penetration testing.
BLACK BOX PENETRATION TESTING
Pre-requisites:
- Collect IP Address of the machine over which the product is installed
- Password credentials of the machine on which the product is deployed (Not product or application credentials, if it’s SSO then different story altogether)
- Firewall blocking and restrictions should be removed as it is not network penetration testing
- Application should be deployed in a separate environment which does not affect production
Step1: Information Reconnaissance
- Review public discussion forums for any leaked information on product
- Check for the product support forums
- Gaining information on product through search engines
Step2: Scanning and application fingerprinting
- Discovering application Services and ports used by the application
- Discovering User access handing Flaws
- Discovering Authentication Flaws
- Discovering Session Management Flaws
- Discovering Access control Flaws
- Discovering user input validation flaws
- Discovering flaws in error handling and Input handling
- Inference from published contents
- Application finger printing
Step3: Exploring the Application technology and Protocols uses
- Exploring application protocol requests and response for flaws
- Exploring application URLS for flaws and vulnerabilities
- Exploring cookies used by application
- Exploring for Server side and Client side Functionality Flaws
- Identify entry points for user inputs
Step4: Enumeration and Application Attacks
- Enumeration of content and functionality of application
- Enumeration using Webspidering and user-direct spidering
- Discovering hidden contents
- Brute force and dictionary attacks
- Discovering Hidden Parameters
- Buffer over flow attack
- Session hijacking and men in the middle attacks
- Authentication attacks
- Brute forcible login
- Verbose Failure Message
- Using password change and forgotten password functionality
- Access control attacks
Step5: Injection of Code Attacks
- Injecting into interpreted languages
- Injection into SQL
- Exploiting SQL injection Bugs
- Bypassing Login
- Injecting into different statement types
- XSS attacks
- Cross-site scripting attacks
- Exploiting Path Traversal Flaws
- Stack and heap overflow attacks
- Data base attacks
WHITE BOX PENETRATION TESTING
All above steps apply but in this case you’ll have complete access to source code, design and architecture documents, database details, etc
Mainly it’s all about
- Product Source Code review – Identify security flaws in the java, c/c++, etc programming code
- Database design – Identify flaws in database design
- Error handling – Exception and error handling plays a vital role
That’s all for now!

Visitors

